
Kubernetes continuous integration using BuildKit, Buildx and docker registry
At Greeneye we took the decision to be fully kubernetes oriented. This means that we aim to use kubernetes in everything we do:
Production
Backend tools
Continuous Integration (CI)
Continuous Delivery (CD)
IoT
In this post we are going to focus on our CI system. In the future, we will consider writing about the rest of the bullets stated above.
Problems

Before diving into details about our problem, we recommend going through these definitions: kubelet; Container Runtime Interface (CRI); Open Container Initiative (OCI); Shim; Docker; Docker Shim; Containerd.
We had few issues, but these 3 were the most critical ones:
Builds are slow.
Cache doesn’t work properly.
Docker shim depreciation
The kubernetes core team announced the depreciation of docker as a runtime container on Dec 2nd, 2020. After this announcement, the community was in stress:
The actual difference is this:

https://kubernetes.io/docs/tasks/administer-cluster/migrating-from-dockershim/check-if-dockershim-deprecation-affects-you/
This change created a huge problem. CIs dependent on cloud kubernetes solutions would not have access to docker daemon.
How we used to do it
Before moving to our new CI, we had five different agents:
“Docker multiplatform” - a Buildx implementation, for building x86/ARM64/ARMv8 images. The agents used a PV with 200GB for caching purposes. They kept on failing for not having enough storage.
GKE Agents - we store part of our data in Google File Store (NFS), and we wanted to have an agent that had a direct access it it. Dependent on docker.sock.
DoD agent - a very straightforward agent that builds using docker.sock. Dependent on docker.sock.
AKS agents temp - works the same as DoD agent, but also supports Kaniko and few more ideas that we tried. Dependent on docker.sock.
ARM agents - dependent on docker.sock, but runs on our own Jetson Xavier devices.
We had no clear way to deploy these agents. We kept experimenting with them and never put the focus on setting this up.
Caching
Most of our experiments were set because we wanted to improve our build time. We tried to find different solutions for distributed docker layer caching but ended up with nothing!

Understanding our caching problem requires the understanding of two things:
How docker works
Knowing about our wrong assumptions about building images in a d distributed system
Docker
First, let’s start with how the docker daemon works:
The Docker daemon (dockerd) listens for Docker API requests and manages Docker objects such as images, containers, networks, and volumes. A daemon can also communicate with other daemons to manage Docker services (source: docker.com)

https://docs.docker.com/get-started/overview/#the-docker-daemon
We are usually used to building docker images either on our own machines or on virtual machine. In these cases, the docker client shares the same machine with the daemon. It might seem legit that the cache is available whenever we get back and use the same machine.
When using a distributed system, our builds occur on different machines/nodes. This raises several issues:
Different nodes mean that we have to build N times to have N caches available on each machine. This happens because each node shares its own docker daemon with an agent.
Nodes come and go, the whole idea of kubernetes is being able to scale up and down as fast as possible. Thus, most of the local cache we had from previous builds might be completely irrelevant.
Even if we decide that we are ok with #2, we are going to experience a storage issue at some point. It is very unlikely that the local storage of the node is big enough to keep so many images, especially when building big docker images like with ML and IoT.
Last but not least, we figured that if we change our CI, we would have to make sure our tests still working as expected. As we run most of them using docker run and the docker daemon is not available anymore we would have to find a good solution for that.
The same goes for CI tests, which usually run MySQL or an equal background service as a dependency. docker-compose triggers the service and requires systemd to be available.
Quick summary before moving on
Our agents used docker daemon aka Docker outside of Docker (DoD) which is mount from the nodes.
We tried tools like Kaniko but figured that they were slow.
Some of our agents used docker build without using BuildKit/Buildx.
We had an implementation of Docker inside of Docker (DinD) which is a bad practice: https://jpetazzo.github.io/2015/09/03/do-not-use-docker-in-docker-for-ci/
Solution
Let's build docker images using BuildKit, Buildx and local-proxy registries!

We have been looking for a solution quite sometime. We tested different tools like Kaniko, Makisu and different ideas we found on Google and such. At the end, we ended up with BuiltKit and Buildx.
BuildKit
BuildKit is a toolkit for converting source code to build artifacts in an efficient, expressive and repeatable manner. Key features:
Automatic garbage collection
Extendable frontend formats
Concurrent dependency resolution
Efficient instruction caching
Build cache import/export
Nested build job invocations
Distributable workers
Multiple output formats
Pluggable architecture
Execution without root privileges
(Source: BuildKit)
Buildx
Docker Buildx is a CLI plugin that extends the docker command with the full support of the features provided by Moby BuildKit builder toolkit. It provides the same user experience as docker build with many new features like creating scoped builder instances and building against multiple nodes concurrently. (source: docker/buildx)
Buildx comes with a useful feature: docker buildx supports —secret flag. It enables a safe way to build images while not including secrets in the image’s history.

https://docs.docker.com/develop/develop-images/build_enhancements/#new-docker-build-secret-information
Emulator
As stated above, we use Buildx to build x86 images alongside ARM64 images. For that reason, we also need to install a cross platform emulator: https://github.com/tonistiigi/binfmt.
Caching
We decided to split this into several layers:
BuildKit daemon will have its own local caching. But, we are not going to be dependent on that.
We are going to reduce network time. As we are using both AKS and GKE together with ACR and GCR, it is important for us to pull images as fast as possible. So, we deploy docker registries served as a proxies.
For CI tests we are going to use a local docker registry. That way we keep our CI tests within the same network instead of persisting them somewhere else.
Build
This is how our build system looks like:

ADO agent
ADO agent is our Azure DevOps agent (it’s not a dependency). The agent creates a docker buildx builder and attaches it to the BuildKit daemon. This runs when the agent starts running:
BuildKit daemon
At first, the BuildKit daemon had an emptyDir. We figured that it will consume the node's storage, and we wanted to prevent errors such as:
The node was low on resource: ephemeral-storage. Container node was using 17007192Ki, which exceeds its request of 0.
We set our registries by mounting the following configMap:
ACR, GCR proxies
ACR, GCR proxies mount an SSD. There is an overhead in the sense of storage, but it’s worth it, especially when AKS tries to pull from GCR and GKE from ACR. Also, unfortunately there’s a problem with caching in GCR, so we need to use ACR as a caching registry.
Local registry
We use this to save our CI tests images.
binfmt
This is a DaemonSet that installs the required emulators on all of our cluster’s nodes.
We are also using this to build the ADO agent itself.
Deployment
We deploy everything mentioned in the build and other services through Rancher. The diagram below shows the general idea. Unfortunately, it would take time to explain how this works. Hopefully we will write a follow up about this topic.

Greeneye’s continuous delivery using Rancher
Tests
I mentioned that we used to run our tests with docker run/docker-compose. As we don’t have access to docker daemon nor systemd, we decided to use Podman:
What is Podman? Podman is a daemonless container engine for developing, managing, and running OCI Containers on your Linux System. Containers can either be run as root or in rootless mode. Simply put: alias docker=podman. More details here. (Source: Podman)
Podman runs “out of the box” (although doesn’t support ARM64 at the moment).
So a replacement for a test would just be podman run ... same as with docker and a replacement for a docker-compose would be the following bash script:
It is a bit longer, but at the end it’s more or less the same as a docker-compose.yaml declaration.
What’s next
We are looking how to improve our services, and this seems to show some good result by now:
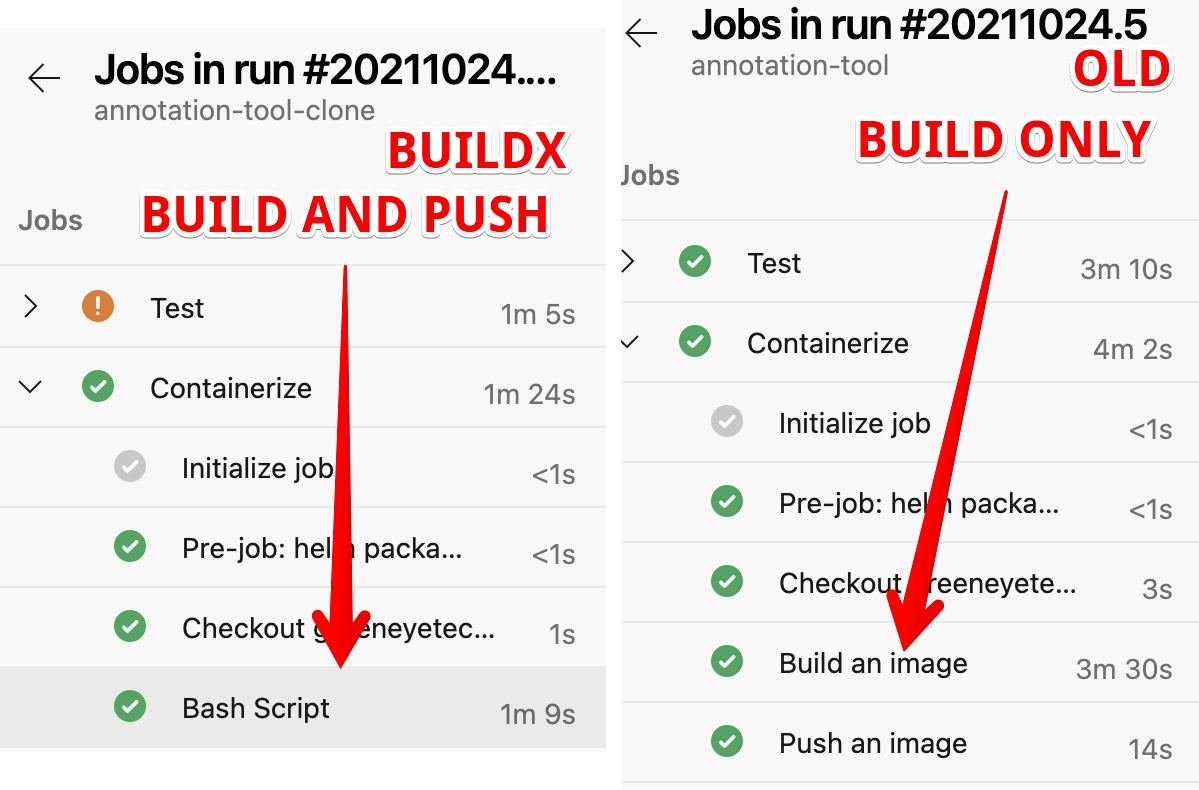
I was quite shocked when I saw this. The great thing about BuildKit is that it works much better with multi stage Dockerfile. So we ended up with a 50% improvement - without caching!
We still have some issues to figure:
We would like to run heavy scale tests.
Should we keep BulidKit’s data in a PV or run a cronjob that cleans it? Maybe registries are more than enough.
We are using a tool to clean our local registry, but it’s not maintained anymore. So we should figure a better way to do that.
We should clean our ACR and GCR registries as we keep a lot of old junk.
We would like to take a look at Github’s pipeline caching. Maybe one day this will be possible in Azure DevOps?
Project Teleport seems like an interesting idea, although I’m a bit worried about the network.
Interesting projects I saw during this research:
That’s it for today. If you find this blog post interesting, or you have any farther questions, please feel more than welcome to tweet or DM me on Twitter @shakedko.
